|
|
Wilderness: A Survival
Adventure
|
|
|
Wilderness: A Survival
Adventure
|
References:
MobyGames Page (LINK)
Let's
Play – Let's not die horribly in Wilderness: A Survival
Adventure! By Covski on Something Awful
Wes Huntress'
Webpage (LINK)
It's an early “survival simulation” that was designed nearly 30 years ago in the mid-1980s and distributed by a small company named Electric Transit.
The core game was programmed by two NASA JPL employees, Wesley Huntress and Charles Kohlhase in their spare time and it was released in two major versions:
Apple II Version (July 1985) using 6502 assembly language with a
custom disk operating system
IBM PC Version (June 1986) using C
The IBM version had several improvements over the Apple II version, such as the addition of “LOOK STARS”.
There were also several sub-editions, each containing a different topographical region for exploration:
Sierra Nevadas Edition (The most widely distributed version, as it was the “basic” version sold in stores)
New Guinea Edition
Chile Edition
Burma Edition
British Columbia Edition
Global Explorer Edition (This version contained all the expansion disks in a single version; it is quite rare, only one confirmed copy of the Apple II version exists in a collector's hands, and he won't let it be imaged.)
|
In 2013, someone dug into the MS-DOS WILDERNESS executable with the DOSBOX debugger (LINK) and found that: Changing the 0003167A (202362) byte in WILD.EXE changed the version that the game considered itself; with the following values representing various versions: 00 = Global Explorer Edition |
Wilderness, in all it's editions, centers around two basic “plots”:
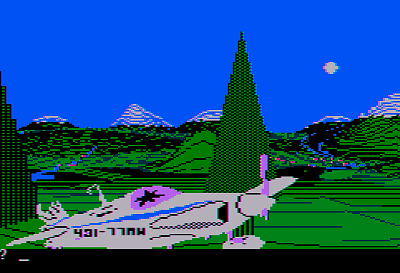
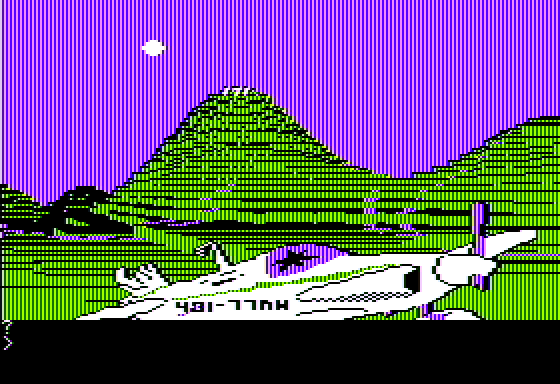
The Plane Crash Scenario: You're alone, miles from civilization, with no hope of rescue. A dusting of snow covers the trees and surrounding mountains. You shiver with cold and wonder how you're going to make it to safety. A ranger outpost is plainly marked as a colored square on the topographic map you managed to pull from the wreckage of your airplane. But the map covers an area twice the size of the state of Delaware, and your crash-site could be anywhere. Survival depends on determining your location, and then hiking to the safety of the outpost.
The Indiana Jones Scenario: You’re an adventurous archaeologist determined to establish yourself in the professional community. A long-forgotten map and several obscure bits of evidence have sent you in search of the Lost City of Gold, rumored to contain the riches of Croesus and a priceless statue. Discovering the City will be an astounding find; one that will secure your fame and fortune. You are airlifted to a remote ranger outpost. From there you must trek deep into the wilderness, obtain the statue, and return to the outpost, alive!
There are two basic modes:
Play Mode (P) – Play Mode exposes you to all the conditions and consequences of a real survival journey. You must attend to your physical state and to environmental circumstances such as weather and wildlife encounters, and your current position on the map is unknown. Remember that this game was programmed in 1985, well before portable GPS was a thing!
Research Mode (R) – In research mode, hunger, thirst, exhaustion, disease, or injury do not affect you; and you can use this as a “practice” mode to learn how the various systems in the game interact, such as observing the path of the sun and using various navigational methods. Additionally, your current location is always marked on the topo map – in magnified view, push “L” and your location will appear as a small white dot. Effectively, you are a Cyberdyne Systems Series 800 Model 101 Terminator traveling to a resistance outpost where your mission will begin.
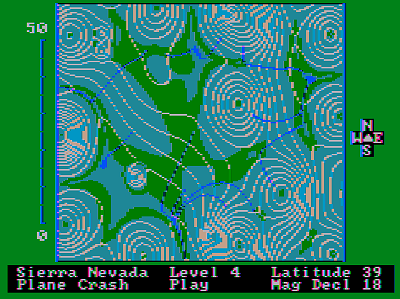
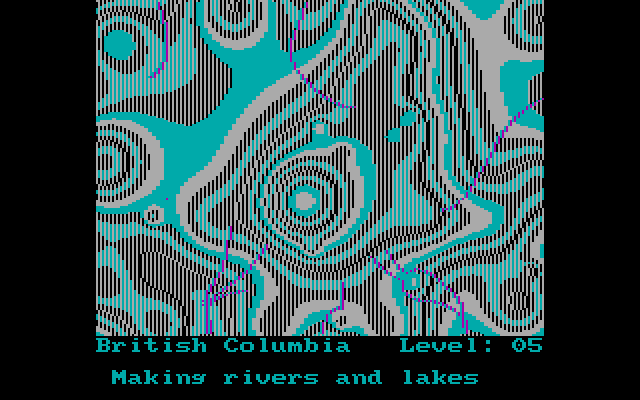
The custom Pangraphics game engine combined an open world 90 x 67 mile (6,030 square miles) 2D/3D map system that included one pre-generated Level 7 map to play on, with the capability of generating your own random map with a selectable difficulty level from 1 (easiest) to 10 (hardest).
There was also a quasi-adventure game like interface parser and a rather sophisticated (for the time) simulation of various survival dynamics.
For example, if you're wearing heavy clothing in hot weather, you will sweat and quickly suffer heat stroke, whereas if you are wearing too-heavy clothing in cold weather and exercise vigorously, you will sweat under your clothing, which becomes a problem as your sweat will either freeze or become cold and clammy against your skin.
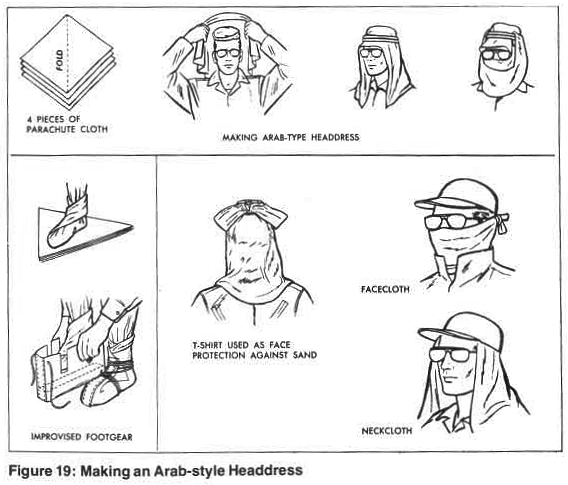
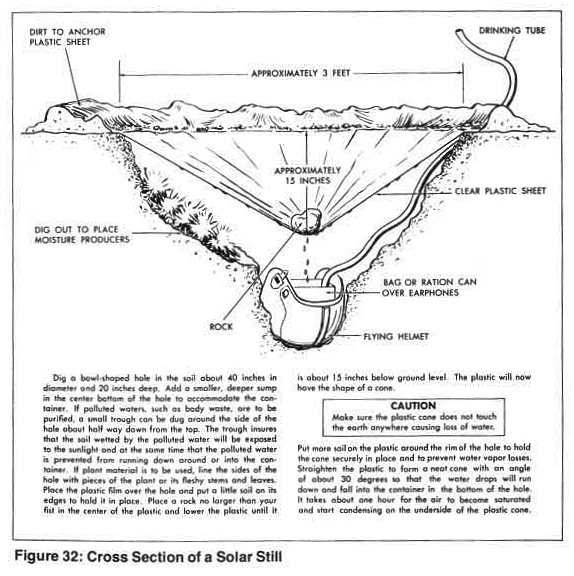
What made the game especially memorable was the custom spiral-bound hardback manual (9.5 MB PDF) that also doubled as the game box/disk holder; the manual didn't just tell you how to play the game, it featured all sorts of survival artwork and data interspersed across its 114 pages:
One must imagine that many people actually spent more time reading the manual (this writer included) than actually playing the game!
There are a few ways you can play Wilderness today, they are:
Play the Apple II Sierra Nevada v1.1 Edition online at Internet Archive (LINK); but you won't be able to save your game, etc.
Play the MS-DOS Sierra Nevada Edition online at Internet Archive (LINK); but you won't be able to save your game, etc.
Roll your own off-line DOSBOX Environment, using the Something Awful compilation which was posted (HERE) by Covski.
Covski's compilation contains the following Topo Maps which can be used via the “A new journey on one of your maps” option:
BCOLUM – Level 7 map in British Columbia.
BOLIVIA – Level 7 map in Bolivia.
BURMA – Level 7 map in Burma.
CHILE – Level 7 map in Chile.
NEWGUIN – Level 7 map in New Guinea.
CHLLENGE – By Covski – This challenge run is set in the Sierra Nevadas in the summer, on the same difficulty as the Goonpa run, so there shouldn't be too many situations that you'll be completely unprepared for. – If you want to use it, choose “Resume a previously played journey” and load the provided CHLLNGE save.
GOONMAP1 – By Covski – You get the exact same starting position as Covski's Goonpa had in the Something Awful Let's Play.
Playing via online emulators will get you started right away; but some special care is needed for an offline DOSBOX environment because Wilderness is a bit “special”, being programmed fairly early in the Personal Computer era.
Below is a comparison of the different video modes that Wilderness can access, and how to access them:
No special action needed, just play through an Apple II Emulator.

No special action particularly needed, or special DOSBOX versions needed, just that in your .conf file, you have it set to one of the following machine types:
machine = cga
machine = ega
machine = svga_s3
and that you run the built-in Wilderness Graphics Configuration Screen, which can be accessed via the following DOS Commands:
del CONFIGUR.DAT (if it exists)
WILD.EXE
and selecting
[1] RGB Monitor / Standard Color Graphics Adapters
at the graphics adapter selection screen

This is a very specialized mode that uses certain tricks/hacks taking advantage of how monitors at the time worked to get 16 colors on screen simultaneously, at the the price of text sharpness (text is blurrier now).
To use this mode, you'll need a DOSBOX variant that supports it; such as DOSBOX-X – specifically version 0.83.17 (LINK).
Why 0.83.17? Because with the latest version (2022.12.26) when you try to load Wilderness, the emulated system “hangs” when you type in WILD. I don't know why, and I'm not going to figure out what's going wrong.
To set up DOSBOX-X correctly in this mode; in your .conf file, set
fpu = false
or
use a DOSBOX-X version compiled on MiniGW instead of the VisualStudio version (if available).
Why? Because Wilderness is one of the rare games that uses the 8087/287/387 Floating Point Unit (FPU) secondary CPU add-on if it is either on physical hardware or emulated hardware.
One of the ways you can test for this is to try to generate a topographic map.
Correctly
working FPU in DOSBOX 0.74
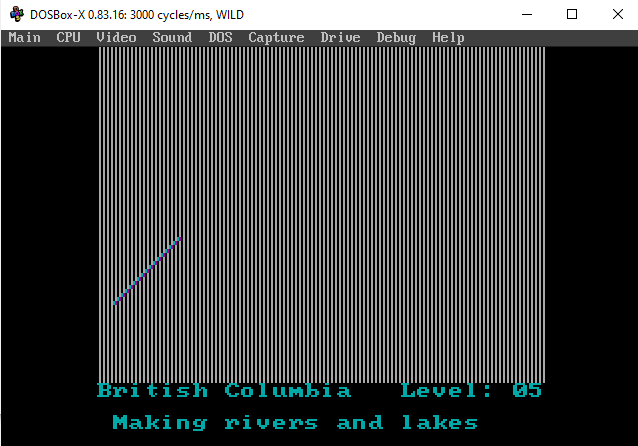
Incorrectly
working FPU in DOSBOX-X variant compiled on Visual Studio
After much trial and error; I narrowed this bug down to the FPU setting in DOSBOX-X; and found that when it was set to:
fpu = false
DOSBOX-X correctly generated maps.
This is not a DOSBOX-X problem, but more of a Microsoft-caused problem.
According to TheGreatCodeholio (main dev of DOSBOX-X) (LINK)
Visual Studio 2019 builds cannot do full 80-bit floating point unit precision except with dynamic core enabled, because Microsoft long ago (during the Win16 to Win32 to Windows 95 transition) decided that “long double” should just be “double”. So there's no C++ compiler support for working with the full 80-bit precision, and that's why FPU precision is a problem there. GCC/MinGW still retains “long double” as 80-bit float and therefore no problems. Dynamic core is the exception to the rule because of the inline ASM used to access the FPU. This is not a DOSBox-X problem but a problem for DOSBox SVN (which uses plain “double” anyway as far as I know) and all forks in general.
Returning to the .conf file, set
machine = cga_composite
then run the built-in Wilderness Graphics Configuration Screen, which can be accessed via the following DOS Commands:
del CONFIGUR.DAT (if it exists)
WILD.EXE
and selecting
[2] Composite Monitor: IBM Color Graphics Adapter
at the graphics adapter selection screen.
Once in the game and at the starting screen; you now need to correctly set the tint of your virtual monitor.
The Wilderness manual itself says on page 10:
“We suggest you use a color monitor or television to more vividly recreate nature. Make sure the tint is adjusted so that the sky is blue and the world appears in its proper hues.”
Here are the DOSBOX-X Hotkeys to adjust your virtual CGA Composite monitor:
CTRL-F8 – Toggle Composite Output on/off.
CTRL-F7 – Shift the emulation to/from early and late model IBM CGA adapters.
CTRL-SHIFT-F7 – Decrease Hue of “Monitor”.
CTRL-SHIFT-F8 – Increase Hue of “Monitor”.
A correctly adjusted DOSBOX-X environment should look like this on the stock scenario with about eight (8) presses of CTRL-SHIFT-F7:
Composite
CGA Monitor with Hues altered with eight (8) presses of CTRL-SHIFT-F7
Below is a compilation of basic game screen information/hotkeys, etc to get you started.
BIG TIPWhen starting your journey, whether from the plane crash or the ranger outpost locations, always CARRY BACKPACK first, before putting items into the backpack! This way, you can correctly gauge how much weight you have left; rather than tossing everything into the backpack and then trying to CARRY it, only to find that you can't because it's too heavy. |
|
V |
Opens the Main View Screen |
|
TOPO |
Opens the Topographic Map Screen NOTE: You cannot see this at night, unless you have a source of illumination (flashlight, match, or your campfire). NOTE II: Each contour line in Wilderness represents a height difference of 400 feet (122m) Topo Map Hotkeys are: K or Right Arrow Key – Move Map Right |
|
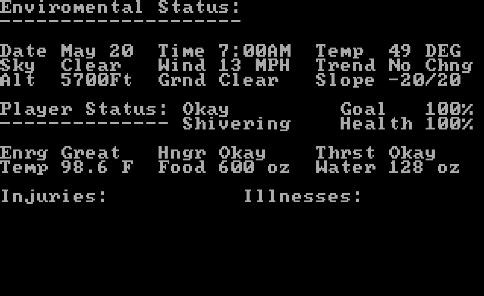
STATUS |
Status screen that
shows current environmental conditions and your personal state of
health. NOTE: Altitude sickness is a potential problem above elevations of 10,000 feet, unless you are physically well-conditioned or you have an oxygen tank with you. TIME: The time of day. If you have a watch, time is given in hours and minutes (0:00A or 0:00P) to within 10 minutes. If you’re not wearing a watch, you’ll see DAWN, AM, PM, DUSK, or NIGHT. Time of day influences air temperature, visibility, and your chances of encountering small game or wildlife. WIND: Wind speed is given in miles per hour (xx MPH). High winds can increase the dangers of travel, especially in rugged terrain. When combined with rain or snow, it can reduce visibility. In extreme cold, the wind magnifies the effect of low temperatures (wind chill factor) and increases the dangers of exposure. TEMPERATURE (TEMP): Air temperature. If you packed a thermometer, temperature is given in degrees Fahrenheit. If you neglected to pack one, you’ll see FREEZE, COLD, NICE, ‘WARM, or HOT. Air temperature has a profound effect on the human body. Hypothermia, a drop in body temperature due to exposure to very cold weather, can cause death. Hyperthermia, a rise in body temperature due to overexertion in very high climates, also can put an end to your adventure. Food spoils more quickly in high temperatures; natural food sources, like game and edible plants, are less abundant during cold weather. fluid lost during exertion must be replaced more frequently when sweating is excessive; frostbite is a danger when the body is exposed to extreme cold. |
|
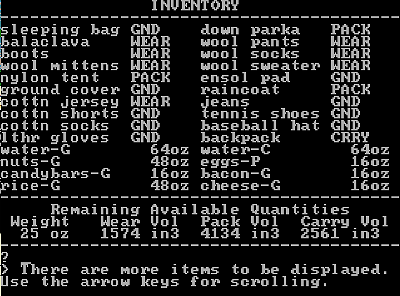
INV |
Inventory Screen that shows what you're
carrying at the moment. WEAR = You are currently wearing the item. NOTES:
|
|
HELP |
Brings up a HELP screen that will offer a list of the most important pieces of survival advice specific to your location and situation. |
|
CLUE |
A series of hints about the location of the Lost City of Gold; available only in the LOST CITY scenario. |
Main View Controls |
|
|
PAN LEFT |
Will continuously pan the screen left (or right) until you push ENTER/RETURN. |
|
LOOK LEFT |
Looks 90 degrees left of current view |
|
LOOK RIGHT |
Looks 90 degrees right of current view |
|
LOOK HALF LEFT |
Looks 45 degrees left of current view |
|
LOOK HALF RIGHT |
Looks 45 degrees right of current view |
|
LOOK BACK |
Looks 180 degrees (behind) of current view |
|
LOOK UP |
Looks 45 degrees above horizontal |
|
LOOK DOWN |
Looks 45 degrees below horizontal |
|
LOOK FORWARD |
Looks straight ahead. |
|
LOOK SUN |
Places the sun in the center of your field of view. |
|
LOOK STARS |
Places the Northern (or Southern) Celestial Pole in the center of your field of view, depending on whether you are above or below the equator. |
|
LOOK COMPASS |
This determines your current azimuth from your current view. The compass has a luminous dial so you don't need a flashlight at night. |
|
LOOK NORTH/SOUTH/WEST/EAST |
You can only use these commands if you have a compass equipped or have determined your location via navigational techniques. |
|
WALK |
Travel in the direction of the current view. You can use WALK FOR 2 HOURS. Your journey then continues for the amount of time indicated unless something occurs to stop you. You can be interrupted by several categories of events. Typical travel speeds on level moderate terrain are: WALK – 2 to 3 MPH If your leg is broken and you don't have a splint or anything, the only way you can move is via CRAWLing. |
|
WAIT |
WAITing causes the indicated time to pass. Useful for when you are estimating time via passage of the sun, or waiting out severe storms. |
|
FIRE |
To make fires in Wilderness, you can use: Matches via USE
MATCHES → MAKE FIRE If you don't have any, you can use improvised fire lighters such as: Use a Magnifying Glass when the sky is clear is the sun is above 30 degrees via USE GLASS → MAKE FIRE. Make fire sticks via USE KNIFE → MAKE STICKS → USE STICKS → MAKE FIRE. Once the fire is going, you can use it for cooking, warmth and boiling water until you extinguish it via DOUSE FIRE. |
|
Food Command Parsers: |
USE FIRE/USE UTENSILS/BOIL WATER USE RAINCOAT/MAKE WATER FIND FOOD FIND WATER or GET WATER USE FIRE/COOK (food) EAT (food) TASTE, SAMPLE (food) DRINK WATER |
|
First Aid Command Parsers: |
USE SNAKEBITE KIT EXERCISE USE FIRSTAID KIT USE SOAP USE FLAGYL IODINE TABLETS LOWER HEAD USE OXYGEN TANK CUT BODY/SUCK VENOM/USE PRESSURE USE QUININE USE REPELLENT (insect) EAT SALT TABLETS MAKE SPLINT/USE SPLINT STOP BLEEDING or USE PRESSURE USE SUNSCREEN |
|
Weapon/Hunt Command Parsers: |
SCARE (animal) CLIMB TREE WAIT USE KNIFE/SKIN (animal)/ USE (weapon)/KILL (animal) |
|
Simulation Parsers |
SAVE RESTORE |
CAMPSITE COMMANDSNOTE: Select your campsite location carefully. Avoid the base of steep slopes or areas in which you run the risk of avalanches, floods, rockfalls, or punishing winds. In mountain areas during the summer, you'll need protection from rain and insects. Choose a site near water and timber but on high, dry ground. A good location is a ridge top or lake shore. If you find yourself in the tropics, select a knoll or high ground away from swamps for your campsite. You'll be bothered less by mosquitoes, the ground will be drier, and there will be more chance of a breeze. A typical phrase sequence that encompass of setting up a campsite is: DROP BACKPACK |
|
|
ENTER/USE AIRPLANE |
The wreckage at the plane crash site can be used as shelter. Make your fire outside and at a safe distance from the airplane to prevent carbon monoxide poisoning. |
|
ENTER OUTPOST |
If you are within 0.2 mile from the Ranger outpost, you can use the structure as shelter from the elements. |
|
ENTER CITY |
If circumstances require that you seek shelter when you are near (within 0.2 mile) the Lost City of Gold, you can enter it for shelter. |
|
DROP BACKPACK |
Do this before setting up your campsite, as the extra weight of the backpack and it's contents will tire you out quicker. Don't forget to retrieve it when you're done! |
|
Shelter
Type |
Setting up the tent requires 30 minutes of time, and is done by simply typing MAKE CAMP. If you typed MAKE CAMP 3, you would get 2.5 hours of rest. |
|
Shelter
Type |
This is the simplest of outdoor shelters, warm and relatively waterproof. Construction of the trench is via: USE AXE (speeds up construction) |
|
Shelter
Type |
For construction of a hut, trees, branches, and grasses must be available in the immediate area. USE AXE (speeds up construction) |
|
Shelter
Type |
This shelter takes time to construct, although use of an axe during daylight or a flashlight at night hastens the task. The igloo provides excellent protection from cold, wind, and snow and is probably the best shelter in alpine or arctic conditions. The temperature inside an igloo can be several degrees above freezing, regardless of the outside temperature. To construct an igloo, use the phrases: USE AXE (speeds up construction) |
|
Shelter
Type |
This is a natural shelter found in rocky terrain, affording protection from the elements. You are alerted to the presence of a rock shelter when you are within 0.2 miles of one. ENTER/USE SHELTER |
|
Shelter
Type |
This is a natural shelter found in forests or jungles providing some protection from weather and sun. You are notified that you are near a wood shelter when you are within 0.2 miles of one. ENTER/USE SHELTER |